Tag Archives: fabric

Spoonflower

10 May

Ever heard of spoonflower?  Well I think they’re pretty awesome (and they don’t even pay me to say that).  It’s a website that lets you design your own fabric!  And since one of the Spring 2012 trends is digital image print fabric, I thought I would share.  You can also browse other people’s designs (and sell your own), which is pretty neat.

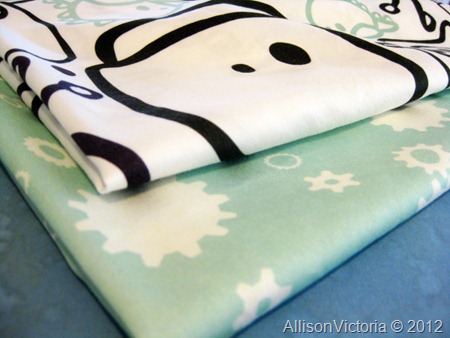
A while back they had a two fat quarters for the price of one deal, so I decided to try them out.  I chose two designs (from two different designers) that I thought looked good together on the screen.  One has monsters and robots on it, the other has gears.  Yes, I like monsters and gears.  I thought it would add a little whimsey to my bedroom to have such a fun print as an accent pillow.

IMG_2462

The colors are pretty true to how they looked on my computer screen, so the bluish green from the one designer almost exactly matches the bluish green background of the gears.  Score on that one.  It came fairly quickly and the fabric was wrapped in tissue paper with a little spoonflower sticker on it.  I like the little touches.  The only thing slightly disappointing was that the print doesn’t go all the way to the edges.  I’m not sure if that is because of something the designer did, or it’s just how they print their fabric.   I probably lost 2-4″ total in both length and width due to the print not extending all the way out.  Oh well, I’ll have a slightly smaller pillow now.

If you are interested in creating your own fabric or if you just need that perfect stripe or polka dot and it seems like it is impossible to find, it’s good to know there is an option out there.  It’s a little bit on the expensive side, but unique fabric can really make an outfit (or a room)!   I hope more fabric printing options come available to DIYers in the future, I love the concept.

PS.

You can find the monsters fabric I bought here

and the gears fabric here

How to Reupholster a Chair

4 Apr

I decided I needed to recover my dining room chairs because some of them had sustained a little sun damage and were unraveling at the corners.

The chair before:

IMG_0496

::POOF::

The chair after:

IMG_0498

Now, wasn’t that quick and painless?  Oh my little fabric elves are amazing.  But seriously, the process took a lot longer than that.  And when I say a lot I mean a lot.

Step 1: Browse for and buy fabric

This involved scouting out internet sales and hemming and hawing over the fabric for way to long, asking my husbands opinion, and then saying screw it I’m buying it anyway.  Fabric.com was having a big sale on upholstery fabric, especially fabric they weren’t going to be stocking any more like this Robert Allen damask.  I fell in love with the photo online and after some internal debate and an email sent to my husband I ordered some.  I ordered 4 yards of it, which turned out to be waaaay too much.  I could have gotten away with ordering 2 yards, since this is 60″ wide fabric.

Step 2: Wait for said fabric to arrive

I can’t remember how long this step took, maybe 3 days?

Step 3: Fawning over fabric and trying to come up with a Plan

Since this is a damask, each side is the complete opposite of the other (so where you see brown on one side you see white on the other),  so this fabric has a darker side and a lighter side.  I spent a week or two deciding which side I liked the best.  At first I liked the lighter side best and dutifully covered one cushion before standing back and deciding I didn’t like it.  I’m a woman.  I’m allowed to change my mind, right? So then I had to rip it all out and start again.  Sigh.

Step 4: Actually cover the cushions

It probably took me about 45 minutes to do each chair.  So I guess, in theory this would have taken me 3 hours to cover all 4 dining room chairs.  I, however, only had the energy to cover one chair a night, with several nights in there thrown in for procrastination’s sake.  So yeah, this step probably took me a week to.

Here’s what I did:

First, remove all the screws that hold the cushion to the chair frame.

IMG_0499

I had 4 of them.  These screws were a little difficult to get out because they were so tight in there, but I muscled my way through.

Then lift the chair cushion off of the frame.

IMG_0500

It helps to have an inquisitive puppy to do the heavy lifting for you.

Then, center your cushion over a square of fabric (I made sure before hand that the square would indeed cover the cushion and cut out all four squares at once).

IMG_0507

You can see that this is the “lighter” side, which I deemed the “back” after much debate.

Next you should staple the front and the back down, being sure to stretch it tight.  I used 1/4″ staples for the sides and 1/2″ staples for the corners (which I had to run out and buy because I originally only had 1/4″ staples, and they weren’t long enough to go through the folds you have to make at corners).  Add another day to process.

IMG_0508

IMG_0509

woo.. staples

Do the same thing to the sides and add a staple near each of the corners.  Sorry this picture is a little fuzzy.  I thought it was clear when I took it, and I’m not undoing my hard work to take another one.

IMG_0510

Then you’ll want to take the excess fabric by the corners, fold it, and stretch it over the corner trying to make it as flat as possible

IMG_0512

IMG_0514

And then once you’re happy with it, staple it down.

IMG_0515

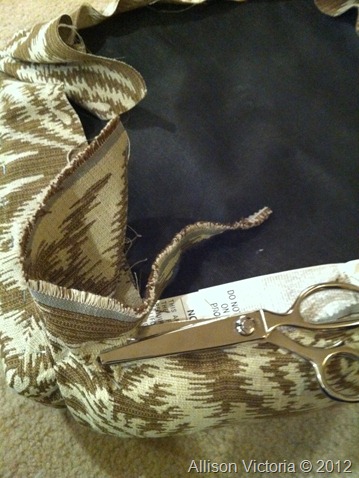
Then I cut off the excess with pinking shears to prevent fraying.
IMG_0519

And there you have it, a newly recovered dining room chair.

IMG_0520

And here it is on the chair, again.

IMG_0497

So unlike those other blogs that will tell you it will only take you 3 hours to cover your chairs.  I’m here to tell you the truth.

Time to cover dining room chairs: 18 days-25 days

I lost count.

Yep.  Don’t let anyone fool you into thinking it’s just going to take 3 hours.  They’re liars.

Trend: Brocade

24 Feb

Since fashion week has come to a close, I thought I would take a look on the upcoming trends.   According to stylist.com one of the fall 2012 trends is bold brocade:

Bold Brocades

Fall 2012 Trend: Brocade

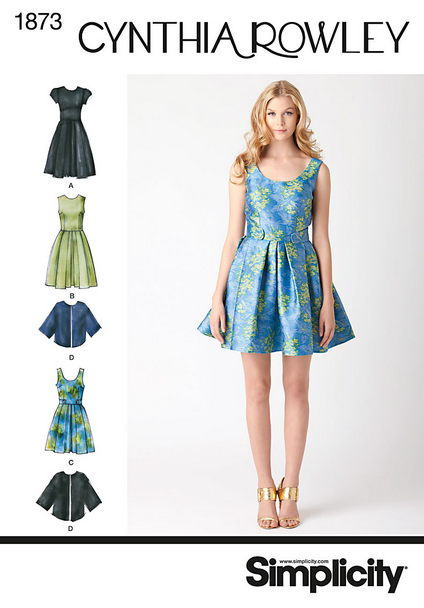
Can you believe Cynthia Rowley actually “liked” this board?  Okay, okay.  I know it was probably just some interns job to “like” everyone who put something “Cynthia Rowley” on their board, but holey crap!  None of my other boards got a “like” from other designers!  So way to go peeps at Cynthia Rowley’s camp.  I’ve now said your name 3 times in a row already.  And you can actually buy a Cynthia Rowley pattern so you can make almost the same exact Cynthia Rowley dress!

image

Just click on the picture to go to the pattern.  How about one more?  Cynthia Rowley.  There.  Now that’s 6.

Cute little ducks!

18 Mar

When I saw this fabric in the $1.95 bin on Fabric.com I just thought it was so cute and sort of vintage-y.

But, since I don’t have a vintage pattern to speak of, I’m sort of at a loss as to what pattern would be cute to use for it.

Option 1:

d43c41ae-6fc0-5277-01a8-5495ed287bc5_224x157

The best thing about the pattern is that it’s free! (Get it here)  And I think it’s cute, but is the print too small for it?  Maybe I have just no imagination since it’s depicted as a solid?!

Option 2:4a2c0c0e-b17a-b452-47e5-f50f0b5deac0_324x432[1]

This is a pattern from the Feb 2010 issue of Burda Style.  I have only 2 Burda Style magazines, Feb 2010 and Aug 2009.  Even with just 2 I feel like I have soo many patterns!  This one is a flirty peasant type top which I think would be easy to sew (a definite plus!)

Option 3:103-ld

The blouse-with-bow.  This is from my other Burda Style mag (Aug 2009) and I love how they made it out of a sheer paisley print in the magazine, so I think a lightweight cotton print like this might do well

Option 4:

42c77e09-611d-428e-550a-5af2464e0e48[1]

This is from my Burda Easy Fashion Spring/Summer 2010 magazine.  I’m not sure I’m in love with the front pleat though, but I love the elastic sleeves and the gathers in the back!  I also like how it is longer in the back than in the front.


Which one is your favorite?

Fabric!

29 Sep

The fabric I purchased for my black holiday cocktail dress came in the mail!  I was wavering between the sophia double knit and the wool jersey as my fashion fabric, but this thread convinced me to go with the sophia.

IMG_1730

Now that I have the fabric, I’m a little unsure if I made the right decision.  The sophia double knit ( a rayon blend ) SMELLS!  I don’t know if I got a bad cut, or if this is typical of rayon and will go away after a wash.  Let’s hope so!

Ultimately I chose it because

  1. Rave reviews of how “nice” this fabric is
  2. Washability (I didn’t know if I was going to have to wash the wool jersey specially, in my house everything gets thrown in the wash together with little care)
  3. It was cheaper (awful reason, I know).  Now the fashion fabric itself wasn’t that much cheaper, but I could get away with less of a lining than I could with wool.

The pattern calls for an invisible zipper, but I’ve been wavering on whether or not I’ll need one with this knit.  It has a 20% stretch.  I’ll probably just baste it together to see before I go out and buy a zip.  But other than that, I’ve got all I need to get it started.